Overview
Use a Raspberry Pi microcontroller to affordably host a website from your home. Be aware: Hosting a website at home creates security risks by allowing external traffic through your router’s firewall. For enhanced security, isolate the Raspberry Pi from other home devices.
Data Flow
Amazon Route 53 → Cloudflare → Home Router → Raspberry Pi
Requirements
- Domain Registrar Account (e.g., AWS)
- DNS Proxy Service Account (e.g., Cloudflare)
- Home Router Administrative Access
- Raspberry Pi (Recommended: Raspberry Pi 4, 8GB RAM)
Step-by-Step Configuration
Let’s go step by step through the configuration process, using AWS and Cloudflare as the domain registrar and DNS proxy service:
- Domain Registrar (AWS)
- DNS Proxy Service (Cloudflare)
- Home Router Administrative Access
- Raspberry Pi
AWS
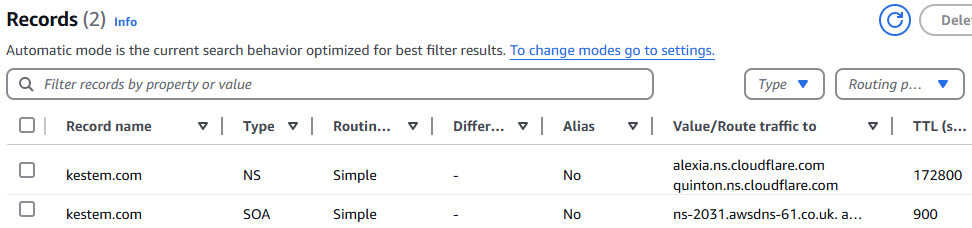
- Update only two records (unless managing email):
- “A” record with Cloudflare’s assigned nameservers.
- CNAME record proxying “www” to website domain.
Many records can be associated with a domain however in our case we wonly need two records. The “A” record needs to be updated for Cloudflare. See below to get your assigned nameservers from Cloudflare. Once updated at the domain registrar, return to the Cloudflare website.
Cloudflare
Go to the main panel to determine your assigned nameservers:
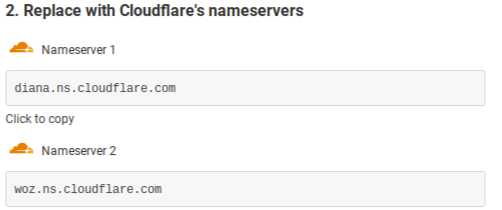
Go back to domain registrar website and update the “A” record for the nameservers.
Cloudflare continued… Getting the IDs
The following need to be gathered (using AWS and Cloudflare as an example):
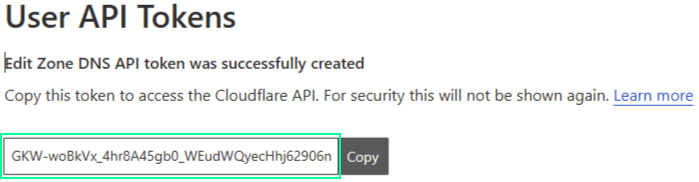
API Token Key
To get this we must first create a new API key at Cloudflare. Once created, this record is considered the “Bearer” character string below.
Zone ID
Click on the domain that has been entered and choose Overview. Look towards the bottom-right for the Zone ID. Save this ID and now find the Record ID.

Record ID
Finding the Record ID is the trickiest to gather. Need to issue an API command to get the ID. From SSH, run the following command while replacing ZONE_ID and API_TOKEN_KEY with your values:
curl -X GET "https://api.cloudflare.com/client/v4/zones/[ZONE_ID]/dns_records" \ -H "Authorization: Bearer [API_TOKEN_KEY]" \ -H "Content-Type: application/json"The response from Cloudflare:
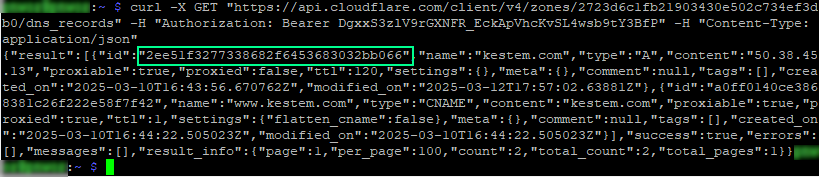
Keep these records handy and now let’s discuss the Python script that will update Cloudflare DDNS.
Cloudflare continued…DDNS API updates
Home IP addresses are generally dynamic. The below script will run on the Raspberry Pi, check current IP and last know configuration, and send an API request to Cloudflare when they are different to update the IP for the “A” DNS record. Enter the previous key and IDs into the highlighted sections below. Continue on below to see how to configure the script to run automatically.
#!/usr/bin/env python3

import requests
import os
from datetime import datetime

# Configuration
CLOUDFLARE_API_TOKEN = 'ABCDEFG1234567890XYZ-EXAMPLE-API-TOKEN'
ZONE_ID = 'abc123def456ghi789jkl012mno345pq-EXAMPLE-ZONE-ID'
RECORD_ID = 'xyz987uvw654rst321opq000lmn999abc-EXAMPLE-RECORD-ID'
DOMAIN_NAME = 'kestem.com'
IP_FILE = 'last_known_ip.txt'
LOG_FILE = 'cloudflare_update.log'

# Logging function
def log_message(message):
    timestamp = datetime.now().strftime('%Y-%m-%d %H:%M:%S')
    log_entry = f'[{timestamp}] {message}'
    print(log_entry)
    with open(LOG_FILE, 'a') as log_file:
        log_file.write(log_entry + '\n')

# Get current IP address of the server
current_ip = requests.get('https://api.ipify.org').text

# Read the last known IP address from file
if os.path.exists(IP_FILE):
    with open(IP_FILE, 'r') as file:
        last_known_ip = file.read().strip()
else:
    last_known_ip = ''

# Check if IP address changed
if current_ip == last_known_ip:
    log_message('IP unchanged. No action needed.')
elif not last_known_ip:
    log_message('No last known IP found. Updating file and Cloudflare record.')
else:
    log_message(f'IP changed from {last_known_ip} to {current_ip}. Updating Cloudflare record.')

# Function to update IP on Cloudflare
def update_cloudflare_ip(ip):
    url = f'https://api.cloudflare.com/client/v4/zones/{ZONE_ID}/dns_records/{RECORD_ID}'

    headers = {
        'Authorization': f'Bearer {CLOUDFLARE_API_TOKEN}',
        'Content-Type': 'application/json'
    }

    data = {
        'type': 'A',
        'name': DOMAIN_NAME,
        'content': ip,
        'ttl': 120,
        'proxied': False
    }

    response = requests.put(url, json=data, headers=headers)
    if response.ok:
        log_message(f'Successfully updated Cloudflare DNS to IP: {ip}')
        with open(IP_FILE, 'w') as file:
            file.write(ip)
    else:
        log_message(f'Failed to update Cloudflare DNS: {response.text}')

# Update Cloudflare if IP changed or no IP was recorded
if current_ip != last_known_ip:
    update_cloudflare_ip(current_ip)
Cloudflare continued…Automatic running of the Python script (Crontab)
Access the crontab and enter the following. This will cause the script to run every minute and only submit an API request if the IP address has changed.
* * * * * /usr/bin/python3 /home/user/scripts/cloudflare_ddns_check_update.py >> /home/user/scripts/cloudflare_ddns.log 2>&1Check cloudflare_ddns.log for update status. Example output is below. It starts by showing the IP address is same at Cloudflare. Then the log shows the IP changed and Cloudflare updated. Finally, more output that the IP hasn’t changed. This will continue until the IP address does change. Continue on to discuss necessary configuration changes for the home router, to receive traffic forwarded by Cloudflare.

Home Router
The following entries need to be made at a “Port Forwarding” or similar page in the router. This will redirect all website traffic to the Raspberry Pi.

Raspberry Pi
The below is a general list of what’s required to run the website. There are many fine guides for installing Raspberry Pi OS along with many guides on the remaining items. Conduct a general search for the details.
- Raspberry Pi 4 8gb RAM
- Raspberry Pi OS
- Nginx Web Server
- Scripting Languages
- Python
- PHP
With that, and some troubleshooting, you should have a functional webserver hosted on your home network!